My mattress is ten years old. I know because I bought it the week I moved into this apartment, and that was the same week my neighbor’s dog learned to bark at 5 AM. I remember both events vividly. The mattress cost $400 from a discount furniture store. It is a queen-size, pillow-top, off-white, and it has seen everything. Coffee spills. Sweat stains. That time I had the flu and did not make it to the bathroom. A red wine incident during a movie night that I still do not fully understand. The mattress has history. Too much history.
For years, I ignored it. Mattresses are not like floors. You do not look at them every day. They hide under sheets and blankets and denial. Then one morning, I stripped the bed to wash the sheets and actually looked at the surface. It was not pretty. Yellowish patches in the middle where my torso rests. A faint brown ring from the coffee. A shadow of the wine stain that never quite left. And a smell. Not a bad smell, exactly. But not a fresh smell either. The smell of a decade of sleeping.
I did not own a steam cleaner. I did not have an upholstery attachment for my vacuum. I did not want to rent equipment or call a service. I wanted to clean my mattress with things I already had. No tools. No machines. Just me, some household items, and a free afternoon. Here is what I did, what worked, what did not, and what I learned about the thing I spend a third of my life on.
What I Was Working With
The mattress is a standard queen: 60 inches wide, 80 inches long, 10 inches thick. Pillow-top, which means the top layer is padded and quilted, with deep stitching that creates channels and pockets. Those pockets collect everything. Dust. Skin cells. Spills that seep in and never come out. The mattress sits on a basic metal frame with wooden slats, about 18 inches off the floor. No box spring. No headboard. Just the mattress and me.
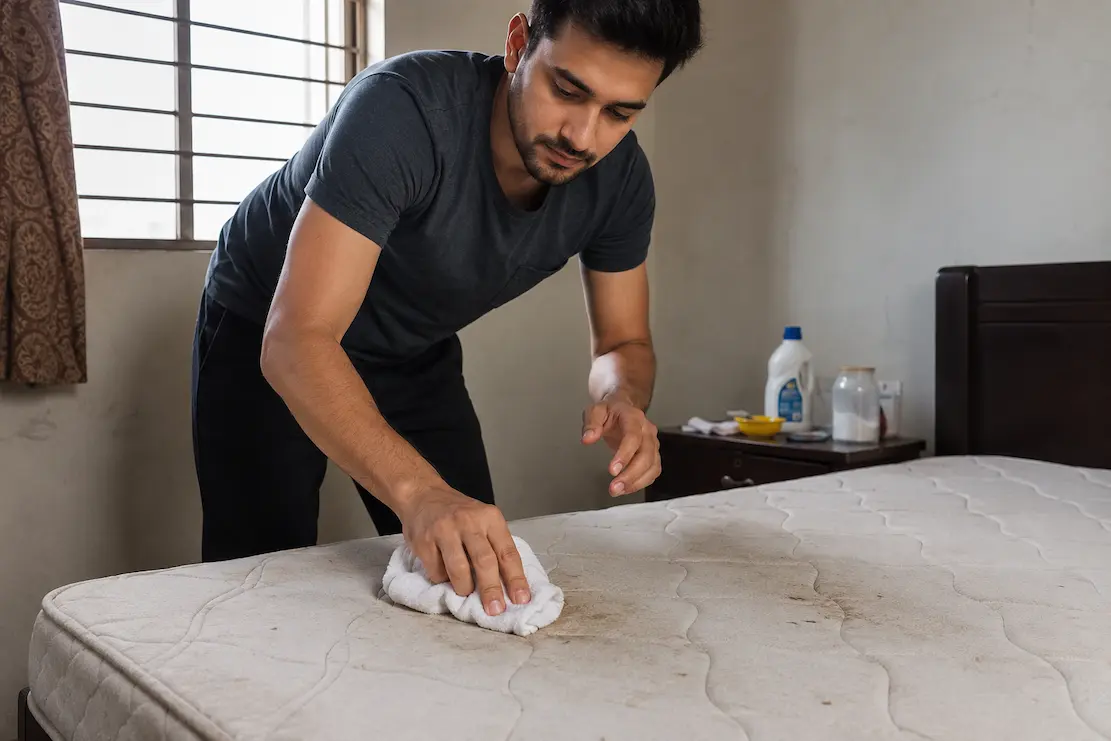
The stains were: one large yellowed area in the center (body oils and sweat), one coffee stain near the top left corner, one faint wine stain near the bottom right, and general discoloration across the whole surface from age and use. The smell was not overpowering but was noticeable when the sheets were off. Like a library book that has been read too many times. Familiar but not fresh.
What I Tried First (And Why It Failed)
My first attempt was a mattress spray I bought at Target for $8.99. It promised to “neutralize odors and lift stains” with enzymes. I sprayed the whole surface, let it sit for the recommended ten minutes, and blotted with a towel. The mattress smelled like fake lavender for two days. Then the original smell came back. The stains looked exactly the same. The enzymes, if they were even in there, did nothing for ten-year-old set-in grime. I used half the bottle and threw the rest away.
My second failure was baking soda alone. I sprinkled it generously over the entire surface, let it sit for an hour, and vacuumed it off with my regular vacuum cleaner — no upholstery attachment, just the floor head. The baking soda did absorb some odor. But the vacuum did not get all of it out. For weeks, I found white powder in the sheets, in my hair, on the floor. And the stains were still there. Baking soda is great for freshness. It is not a stain remover.
I also tried scrubbing a stain with a wet cloth and dish soap. It spread the stain. Made it bigger. And left a soapy residue that attracted dirt. The spot looked worse after I “cleaned” it than before. I learned that moisture plus pressure plus a porous surface equals a bigger stain. Not a smaller one.
What Actually Worked: The No-Tool Method
After those failures, I researched. Not online articles written by people who clearly never cleaned a mattress. I asked my grandmother. She has cleaned everything without tools for seventy years. Her method was simple, cheap, and effective. I adapted it slightly. Here is the full process.
Step 1: Strip and Air It Out
I removed all bedding. Sheets, mattress protector, pillows, everything. I opened the window in my bedroom and placed a fan in the doorway to create cross-ventilation. The mattress needs to breathe. Ten years of trapped moisture and body heat do not leave in five minutes. I let it air for two hours. The surface felt cooler and smelled slightly better just from this step alone.
If you can, do this on a dry, sunny day. Sunlight is a natural disinfectant. I did mine in April, and the morning sun hit the mattress through the window for about an hour. It helps. It really does.
Step 2: Vacuum the Surface (If You Can)
I said no tools, but a vacuum is not really a “tool” in the same way a steam cleaner is. It is standard household equipment. If you have one, use it. I ran my vacuum over the entire surface, slowly, in overlapping strokes. No attachment needed. The floor head works fine if you press gently. I vacuumed the sides too. The amount of dust and lint that came up was embarrassing. I emptied the canister twice.
If you genuinely do not have a vacuum, use a stiff brush or broom to sweep the surface. It is not as effective, but it removes surface debris. I tried this on a small section to compare. The vacuum got deeper into the quilting. The brush just pushed things around. But in a pinch, brushing is better than nothing.
Step 3: Treat the Stains
This is where the real work happens. I made three different solutions for three different problems.
For the yellowed body oil area: I mixed 1 cup warm water, 1 tablespoon dish soap, and 2 tablespoons hydrogen peroxide in a spray bottle. The peroxide is the key. It breaks down organic stains without bleach. I sprayed the mixture lightly onto the yellowed area — not soaking, just dampening. Then I used a clean white cloth to blot, not rub. Blotting lifts the stain. Rubbing spreads it. I blotted for about ten minutes, changing to a clean part of the cloth every minute. The yellow lightened noticeably. Not gone completely, but significantly better.
For the coffee stain: I mixed 1 tablespoon white vinegar, 1 tablespoon dish soap, and 2 cups warm water. I dipped a cloth in the solution, wrung it almost dry, and dabbed the stain. Coffee is acidic, so the alkaline soap helps neutralize it. I dabbed for five minutes, then blotted with a dry cloth. The stain faded to a faint shadow. Good enough for something that had been there for three years.
For the wine stain: This was the hardest. Wine sets fast. I mixed 1 part dish soap, 2 parts hydrogen peroxide, and a sprinkle of baking soda to make a paste. I applied it with my finger, let it sit for fifteen minutes, then blotted with a damp cloth. The stain lightened by about 60 percent. Not perfect. But acceptable. Some stains are permanent. I made peace with that.
Step 4: Deodorize with Baking Soda
Once the treated areas were dry to the touch — about an hour in my well-ventilated room — I sprinkled baking soda over the entire surface. Not a light dusting. A generous layer, maybe an eighth of an inch thick. I used an entire 16-ounce box. It cost $1.29.
I let it sit for six hours. Some people say overnight. I did not have that much time, and six hours was sufficient. The baking soda absorbs odors, moisture, and residual oils. While it sat, I washed my sheets and mattress protector in hot water with an extra rinse.
Step 5: Remove the Baking Soda
This is the critical step I messed up the first time. I vacuumed too quickly, too aggressively. Baking soda got pushed deeper into the quilting instead of being removed. This time, I vacuumed slowly. Light pressure. Overlapping strokes. I went over the entire surface three times, changing direction each time. The mattress looked clean. Felt clean. Smelled clean.
If you do not have a vacuum, use a stiff brush to sweep the baking soda into a dustpan. It takes longer. It is less thorough. But it works. Do it outside if possible, or you will have a white cloud in your bedroom.
Step 6: Let It Dry Completely
I left the mattress bare for the rest of the day. The fan ran. The window stayed open. By evening, the surface was completely dry to the touch. No dampness. No cool spots. I put on a fresh mattress protector — the waterproof kind, which I should have been using all along — and made the bed with clean sheets.
Sleeping on it that night felt different. Not dramatic. Not like a new mattress. But fresher. Lighter. Like the mattress had exhaled after holding its breath for ten years.
💡 What I Learned the Hard Way
Do not soak your mattress. I mean this. Do not pour liquid on it. Do not spray heavily. Do not use a wet cloth that drips. Mattresses are sponges. They absorb moisture deep into the foam and springs, where it cannot dry easily. That moisture becomes mold. I learned this when I over-wet a spot during my first attempt and smelled mildew two days later. The spot had to dry with a fan pointed directly at it for eight hours. Now I use the “barely damp” rule: wring your cloth until it almost stops dripping. Spray from at least 12 inches away in a fine mist, not a stream. And always, always let the mattress dry completely before covering it. A damp mattress under sheets is a mold factory. I was lucky I caught it early.
When This Method Won’t Work
⚠️ When This Method Won’t Work
This no-tool method works for surface stains, general yellowing, and mild odors on a standard innerspring or foam mattress. It will not work for deep-set urine stains that have penetrated to the core. It will not remove bed bugs, which require professional heat treatment or pesticides. It will not fix a mattress that is structurally compromised — sagging, broken springs, or foam that has lost its support. My mattress is ten years old and still supportive, so cleaning extended its life. But if your mattress sags in the middle or causes you back pain, cleaning will not help. Replace it. The general rule is every 7 to 10 years for a mattress, and I am pushing the limit. Also, if you have severe allergies or asthma, a surface clean may not remove enough dust mites and allergens. In that case, a professional cleaning or a mattress encasement is a better investment. I use a waterproof protector now, which helps, but it is not a medical-grade solution.
What Others Told Me
I mentioned my mattress cleaning project to a friend who is a nurse. Her reaction was immediate: “You slept on that for ten years without a protector?” Yes. I did. She explained that the average person sheds about a pound of skin cells per year, and most of it ends up in the bed. Dust mites feed on those cells. A ten-year-old mattress without a protector is basically a dust mite metropolis. I did not sleep well that night.
Another friend said she flips her mattress every six months. I have never flipped mine. It is a pillow-top, so it is not designed to be flipped. But I do rotate it head-to-foot every year now. This evens out the wear. The dip where my hips rest is less pronounced since I started rotating.
The most useful tip came from my grandmother, who said: “Sunlight is the best cleaner.” She used to drag her mattresses outside onto the porch on sunny days and let them bake for hours. I cannot drag a queen mattress through my apartment building. But I can open the blinds. I can position the mattress to catch morning sun. And I can run a fan to simulate airflow. It is not the same as a porch in the country. But it helps.
My Maintenance Routine Now
I do not want to deep clean my mattress again for a while. So I maintain it.
| Task | Frequency | Time | What I Use |
|---|---|---|---|
| Wash sheets and protector | Weekly | 2 hours (machine time) | Hot water, regular detergent |
| Vacuum mattress surface | Monthly | 10 minutes | Regular vacuum, floor head |
| Sprinkle baking soda, vacuum | Quarterly | 30 minutes + 4 hours sitting | 1 box baking soda, vacuum |
| Rotate mattress head-to-foot | Every 6 months | 5 minutes | My arms, a friend if needed |
| Deep clean stains | As needed | 2–3 hours + drying time | Peroxide, dish soap, vinegar, baking soda |
How This Connects to My Other Cleaning Routines
A clean mattress is part of a clean bedroom, which is part of a clean home. I wrote about how I organized my small bedroom easily — the system that keeps the space around the mattress tidy. I also wrote about how I wash curtains without damage, because bedroom curtains collect dust that settles on the bed. And my guide to removing bad smells covers the broader topic of household odors, including the musty smell that old mattresses can develop.
FAQ
Can I use a carpet cleaner on my mattress?
You can, but I do not recommend it. Carpet cleaners inject water deep into fibers and then extract it. Mattresses are much thicker than carpet. The extraction is not strong enough to pull all the moisture out of mattress foam. You risk mold. If you must use a machine, use the upholstery attachment, go slowly, and let the mattress dry for at least 24 hours with a fan blowing directly on it. But honestly, the no-tool method is safer and nearly as effective for surface issues.
How do I know if my mattress has mold?
Smell it. Mold has a distinct musty, earthy odor. If your mattress smells like a damp basement, investigate. Look for dark spots or discoloration that spreads. If you suspect mold, do not sleep on it. Mold can cause respiratory issues. In that case, professional cleaning may not be enough. You may need to replace the mattress. Prevention is everything: use a waterproof protector, never over-wet during cleaning, and ensure complete drying.
Is hydrogen peroxide safe for mattresses?
Yes, in the dilution I use — 1 to 2 tablespoons per cup of water. It is a mild bleaching agent that breaks down organic stains. It can lighten dark fabrics, so test it on a hidden corner first if your mattress is colored. Mine is off-white, so slight lightening is not noticeable. Never use chlorine bleach on a mattress. It damages fibers, creates toxic fumes when mixed with organic material, and leaves a harsh chemical residue where you sleep.
How often should I replace my mattress?
The National Sleep Foundation recommends every 7 to 10 years. Mine is ten and I am starting to feel it. The support is not what it was. I wake up with a stiff shoulder sometimes. Cleaning extended its life and freshness, but it cannot fix structural wear. If you are waking up sore, if the mattress sags visibly, or if you sleep better in hotels than at home, it is time. I am saving for a replacement now. Cleaning this one is maintenance, not resurrection.
What about memory foam mattresses?
Memory foam is more sensitive to moisture than innerspring. It absorbs liquid like a sponge and takes forever to dry. If you have memory foam, be even more conservative with water. Use a barely damp cloth, not a spray. Spot-treat only. And never saturate the surface. Some memory foam manufacturers void the warranty if the foam gets wet. Check your warranty before attempting any liquid cleaning.
Related Articles
- How I Organized My Small Bedroom Easily — The system that keeps the space around my mattress tidy and breathable
- How I Wash Curtains Without Damage — Bedroom curtains collect dust that settles on the bed; keeping them clean helps the whole room
- How I Removed Bad Smells From My Home — The broader approach to household odors, including the musty smell old mattresses can develop
Conclusion
My mattress is still ten years old. It still has a faint shadow where the wine stain was. It still dips slightly where my hips rest. But it smells fresh. It looks cared for. And I no longer feel like I am sleeping on a decade of accumulated grime.
The no-tool method is not magic. It will not make an old mattress new. But it will make a used mattress clean. And for most of us, that is enough. We do not need perfection. We need a surface we can sleep on without thinking about what is inside it.
If you have never cleaned your mattress, strip the bed right now. Look at it. Really look. If you see stains, smells, or just a general tiredness, you have your answer. You do not need tools. You need baking soda, dish soap, hydrogen peroxide, a cloth, and an afternoon. The mattress will thank you. And so will your sleep.
Sources and References
- National Sleep Foundation — How Often Should You Replace Your Mattress — Guidance on mattress lifespan, signs of wear, and when replacement is necessary. Informed my decision to start saving for a new mattress despite cleaning this one.
- EPA Safer Choice Program — Information on selecting safer cleaning products for household use. Supported my choice of hydrogen peroxide, baking soda, and dish soap over harsh chemical cleaners for a surface I sleep on.
- American Academy of Allergy, Asthma & Immunology — Dust Allergy — Information on dust mites, their habitat in bedding and mattresses, and management strategies. Reinforced the importance of regular mattress cleaning and use of a protective cover.

Hamza Farooq is a home improvement and organization writer who shares practical advice on cleaning, simple DIY fixes, and smart home organization. He focuses on creating easy-to-follow guides that help readers solve everyday household problems with realistic, affordable solutions. His goal is to make home maintenance simpler, more efficient, and accessible for anyone looking to improve their living space.